Recipe etc.: Week of Chickpeas
By Chloë Stewart
I’m not really one to ‘meal plan’. Even if, interestingly, that is often touted as quite an effective way to reduce food waste in the kitchen. If I’m honest, I just never get organized. Instead, I like to invest in one ingredient, and see what I can add to it from the excess odds and ends I have lying around [perhaps you can relate…]
There is generally always something that can be done.
Which is what this post is about. Start with a core, multi purpose ingredient, and see just how far you can push it with all the bits and bobs you’ve got lying around. Because as you all know – and even if you’re not quite the food hoarder like myself, we all, somehow, accumulate.
But please, the point is not to spend hours at the store filling up your bag or buying countless seasonings you will never buy again. These ingredients are what I like to think are particularly multipurpose and thus useful fridge and or pantry staples; simply because they have infinite applications in the kitchen. ie., good value for money. OR easily substitutable [it’s a word]. Hence, the ‘Consume’ section that follows, and will always follow, every recipe.
PLEASE NOTE: you will see halves quarters and parts of ingredients. DO NOT THROW ANY OF THE REMAINING halves quarters and parts of INGREDIENTS AWAY. Make space in your fridge and ready your tupperware. By the time we’re through with our chickpeas, we will have used them all. From veggie stock, to cans of tomatoes, chickpea cooking water and parts of onions. Or at least 90% of them. I promise.
Oh and did I mention this entire week of lunches, dinners AND a dessert [slash breakfast?], cost me about £12? [Not including spices, stale bread, an over ripening banana and wilting spring onion etc.].
So. Dry Chickpeas. A cheap and cheerful pantry ingredient. And THIS WEEK’S #1Dish1Week HERO.
To start:
2.5 cups dry = about 7 cups soaked
Soak overnight, in as much water so as to cover them by several inches.
The following day, remove 2 cups of soaked chickpeas before cooking the remaining in their soaking liquid for – and at - the same time you cook the Papa, 1hr30min, remembering to salt at the end. I’d then recommend readying the falafel mix, which you can refrigerate a day or two until ready to shape and fry.
Store the cooked chickpeas in as much of their cooking liquid as needed to cover them by about 1cm, in your chosen tupperware/jar.
RIGHT. Let’s get started.
1.
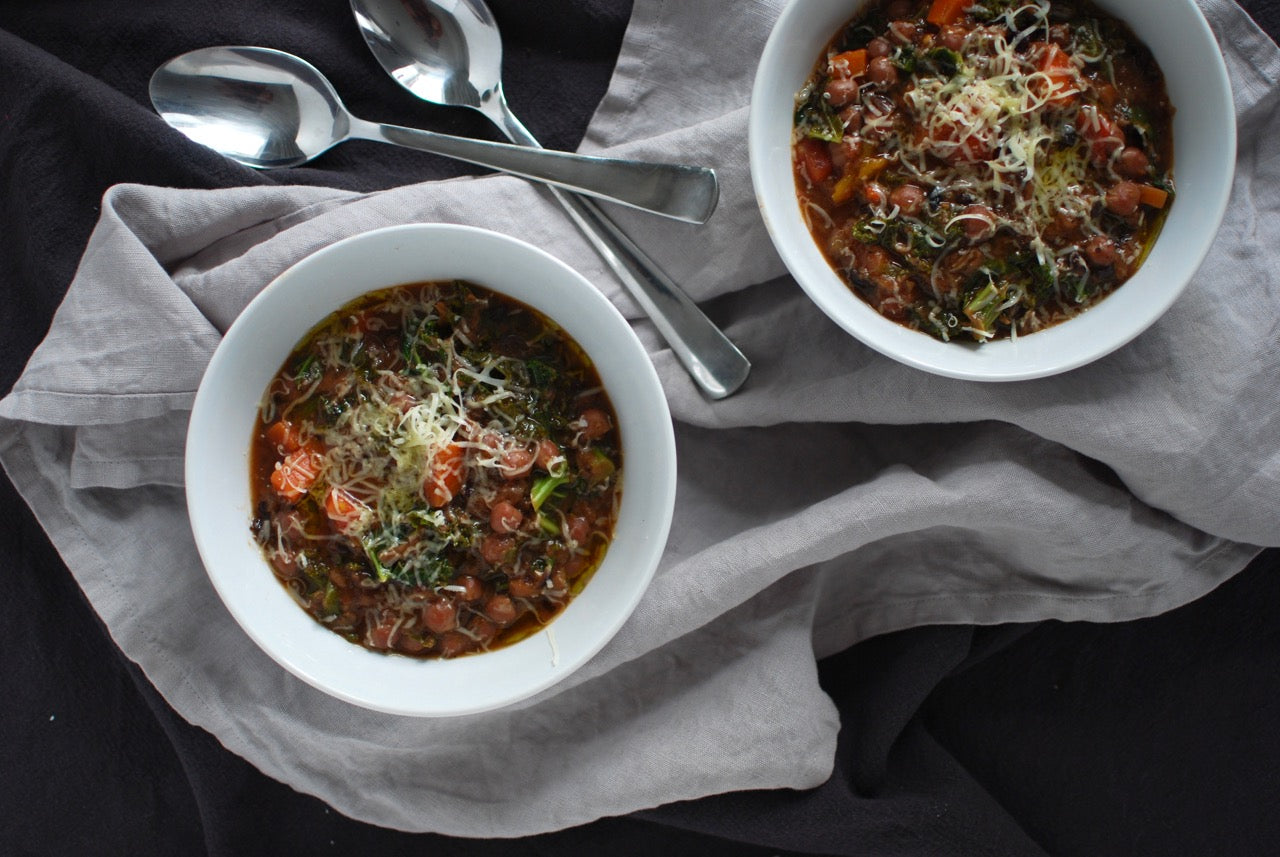
One of the first things I learnt upon landing in Italy for 4 months of eating I mean studying, was a Papa al Pomodoro: a Tomato Bread Soup. I touched upon this in my WWOOF foodoir , but I’ll say it again; the Italians are my Bestover heroes. Of course, every culture has its upcycling tricks, but for some reason I am incessantly inspired by the Italians.


It’s simple really: toast stale bread with olive oil garlic and herb, add to tomatoes and cook until chick and delicious. But this post is about chickpeas. So instead of tomatoes, I was drew from another soup, the Ribolita – cousin to the Papa, shall we say - another Italian upcycling specialty. Hearty, bean filled, and delicious.
And to step it up a no waste notch, because we can, I went ahead and made my own veggie broth in which to cook the chickpeas with the bags – yes bags, my sister is less than pleased at the cause of our reduced freezer space – of veg peels/stalks/stems/roots etc.

This is one seriously no-waste-ass-kicking recipe. If I do say so myself.
Papa al Chickpea
nibs etc. original recipe. Serves 2-4.
Ingredients:
1 cup dried, overnight-soaked, Chickpeas
5 cups Water [when cooked you should be left with 3-3 1/2 cup]
1 small Ziplock Bag worth of Veggie peels/stalks/skins: tomato vine, onion and garlic peel, carrot top, cauliflower leaves and root butt, herb stalks
1 Bay Leaf
3 stalks Fresh Thyme
3 tbsp Olive Oil
1/2 Red Onion
2 Cloves Garlic
4 slices Stale Bread
1 tsp dried Herbes de Provences [anything from Oregano, Parsley, Thyme, Basil, all of the above]
1/2 Carrot
1/2 can Chopped Tomatoes
1 tsp Tomato Paste
2-3 large handfuls Kale
1 tbsp/5g Fresh Parsley
1 tsp salt
Pepper to taste
To serve:
Gruyère cheese
Fresh Parsley
Method:
Place chickpeas first, followed by veggie peels etc., bay leaf, thyme, and finally water. DO NOT stir OR add salt, yet. Bring to a rapid boil, then turn the heat down low and allow to simmer for 1 1/2 hours.
When the chickpea both is ready, carefully remove the skins with a slotted spoon – they should have stayed on top – drain over a bowl to catch any remaining liquid and pour back into saucepan. Discard the peels. Add 1 tsp of salt to chickpea broth, and simmer for a further 5 minutes to dissolve.
In a frying pan, heat olive oil over medium heat, and add diced red onion when hot. Sweat for 5 minutes before adding minced garlic, and sweat until softened and starting to brown.
Cube – into roughly 2cm squared - stale bread, and add to the frying pan with another tablespoon of olive oil. Salt and fry until golden.
Add diced carrot, toss to coat with other ingredients, and caramelise for a couple of minutes, before adding the chopped tomato and tomato paste. Stir to incorporate, then add back into the saucepan with chickpeas and broth, mix well and simmer for 20 minutes.
After which, when the liquid has reduced by half, add roughly chopped kale, and finely chopped fresh parsley, and cook for 5 minutes. Turn off the heat and allow to sit and thicken for a few minutes before serving.
Dish up a couple of hearty spoonfuls into each bowl, and serve topped with fresh parsley and grated gruyère.
Consume:
Substitute chickpeas for any large beans.
Replace kale with any other hearty green: swiss chard, cabbage, etc.
If you do not have a bag of peels in your freezer, simply use vegetable stock, or water with a teaspoon of bouillon powder.
2.

Yes this was my very first attempt at making falafel. Yes it is so much simpler than I, and perhaps you, could ever have imagined. The only crucial detail to note: they are made with soaked DRY chickpeas, NOT cooked [according to the recipe link below].


Lighter than the traditionally fried – simply because I do not have a deep frier, and did not feel like consuming or using that much oil – but just as yummy. And I’m not going to lie, the sauce to accompany is definitely a contender for a new obsession of mine.

Falafel
Recipe inspired by Tori’s Kitchen. Serves 1.
Ingredients:
1 cup Soaked dried Chickpeas
1/4 Red Onion
1-2 clove Garlic
5g/small Handful Fresh Parsley Stalks
5g/mall Handful Fresh Coriander Stalks
1/2 tsp Salt
1/4 tsp cumin
Pinch Black Pepper
To serve:
1 tbsp heaped Plain Yoghurt [The Collective, Straight Up/Plain]
1 tsp Harissa [Belazu]
1 tsp Tahini
1 tsp Honey
1/4-1/2 tsp Salt [to taste]
Fresh Parsley
Fresh Coriander
Method:
When ready to use, drain and place into a blender with the rest of the ingredients. Blitz until it reaches the consistency of uncooked couscous/bulgar wheat – you will want to pulse, the longer you blitz, as you do not want hummus! Make sure to scrape down the bowl every now and then.
When ready, tip out into a bowl and refrigerate for 1-2 hours.
Place a heaped tablespoon of chickpea mix into the palm of your hand and squeeze – hard – so that the mixture forms a clump that just holds together in your hand. It may take a minute or so for it to hold – patience! [However if really not holding together, add a tablespoon of flour to the mix, and or an egg – according to the original recipe]. This should make 6.
Heat enough olive oil/vegetable oil in a frying pan so that the base is entirely covered by a couple of mm. When hot, carefully place each falafel into the pan, and cook for 2-3 minutes – if starting to burn, turn the heat right down, and delicately flip. Turn your falafel onto its opposite side, sealing both top and bottom for a couple of minutes each, before flipping it on its side and sealing the edges for an extra couple of minutes.
When cooked through, place on a paper towel to absorb excess oil, before serving with the yoghurt dipping sauce; to make, mix all the ingredients together in a bowl with a spoon until fully incorporated. Serve – and eat with – fresh herbs.
Consume:
With any other homemade sauce of choice. Start with yoghurt, add dry spice, citrus zing, drop of sweet and season to taste: think garlic, za’atar, cumin, lemon, pomegranate syrup.
With home made flatbreads [recipe can be found here: http://www.nibsetc.com/theslice/squash-chickpea-prune-tagine].
With your own mezze of pickled veg, tabouleh salad, smashed avocado, etc.
3.

It pays off to flick through the pages of a delicious. magazine every now and then. Recently a little short on innovative inspiration. But I’ve found that generally, perusing the pages of my all time favourite food magazine, never fails.
There’s really not much to say about this next step other than the fact it’s incredibly simple, full of flavour, and has so many potential applications, and variations – ie. Feel free to throw in the kitchen sink.


And that half can of tomatoes we used in the Papa? Well, here’s where the rest of it is going to go. Along with the remaining half cup of stock/chickpea cooking liquid for flavour and aubergine-tenderising.
See, we’re getting there.
Quick Aubergine + Chickpea Stew
nibs etc. original recipe. Serves 2.
Ingredients:
1 cup Cooked Chickpeas
3 tbsp Olive Oil
1/2 Red Onion
2 tsp Tomato Paste
1 1/2 tsp Cumin
1 1/2 tsp Paprika
1/2 tsp Cinnamon
1/2 tsp Salt
1 Aubergine
1/2 can Chopped Tomato
1/2 cup Chickpea Stock
2-3 tbsp Balsamic (to taste)
Handful (5g/1-2 tbsp) chopped Fresh Coriander
Method:
Heat 2 tbsp olive oil over medium, adding diced red onion when hot. Caramelise for 7-10 minutes until nice and golden.
Add the tomato paste, all of the spices and salt, stirring to disperse and caramelise evenly, for a couple of minutes, before adding the diced aubergine. Cook on medium heat for another 10 minutes or so until softened and golden brown.
Then add the chopped tomato, remaining chickpea stock, chickpeas and balsamic, and cook for a further 10 minutes. The liquid will reduce and the flavours intensify. Season with salt to taste.
Finally, add chopped fresh coriander, add additional balsamic if you like it a little more bitter-sweet, cook for a further 5 minutes, and serve topped with fresh coriander and a drizzle of olive oil.
Consume:
On toast, over rice, on its own, with couscous and or quinoa.
Eat hot or cold, as a main or side to fish and or meat. Or, crack an egg into it and bake it – shakshuka style – in the oven until just set.
Substitute chickpeas for any other big bean of choice.
Top with cheese: flaked feta, grilled haloumi, etc.
4.

When you buy a packet of herbs, you use them once – probably that night – and then promptly forget about them at the back of your fridge draw.


Well, as it turns out, they make perfect ‘salad leaf’ substitutes. But sometimes, with more interesting flavour. Instead of bulking our, your, next salad with watery, supermarket, unloved lettuce, throw in a handful of fresh herbs, stalks and all. Note, most of the stalks however went into the falafel. So generally, what you’ll have left are the leaves. Which then minimize the amount of dressing and unnecessary add-ins you might normally add to bulk it out.

I’m telling you, it’s a small thing, but it’s revolutionary.
Crispy Baked Chickpea Salad
nibs etc. original recipe. Serves 2.
Ingredients:
1 cup Cooked Chickpeas
2 tbsp + 1 tbsp Olive Oil
1 clove Garlic (skin on)
1/2 Red Onion
1 tsp Harissa [slightly heaped – depending on your spice tolerance]
1 tsp Paprika
1 tsp Honey
1/2 salt
2 Handfuls Kale
1/4 Lemon Juice + Rind
1 Handful Fresh Parsley
1 Handful Fresh Coriander
Feta
Method:
Heat oven to 210*C/200*C fan/400*F.
In a glass – to avoid staining – bowl, combine the chickpeas, 2 tbsp olive oil, whole garlic clove – unpeeled – half red onion sliced lengthwise, harissa, honey, paprika and salt. Mix with a spoon and toss well to coat everything evenly.
Pour onto a baking sheet, spread to a fairly even layer, and place in the oven for 20 minutes, pausing at 10 minutes/halfway to give it a mix and a flip.
Meanwhile, roughly, but thinly, chop your kale – stalks and all. Place in a sieve and rinse. Squeeze any excess water out of the leaves, squeezing hard to breakdown the tougher structure of the kale. Place in a bowl and toss with lemon juice, rind, pinch of salt and remaining 1 tbsp olive oil.
When the baked chickpeas are ready, scoop into the kale bowl – charred/burnt bits and all – and mix well. Add the fresh herbs [maybe torn if long, stems in] and toss to coat.
Serve immediately topped with crumbled feta.
Consume:
With a side of steak, over a chargrilled aubergine half, and or cauliflower ‘steak’. Or, put an egg on it.
Add seeds – sunflower, poppy, linseed, pumpkin - and nuts for additional crunch.
Include pomegranate seeds, cranberries, or a drizzle of aged balsamic for a little extra sweetness.
5.

Once upon a time, during college and seasonal casual drinks parties, I subconsciously dip-zoned hummus.
As it turns out, hummus is so much more, than a dip.
Yes it’s a dip. But it’s also a canvas for roasted red peppers. It’s a pillow for grilled meats. It’s a sauce and topping for salads. And it’s a fantastic spread for any and all toasts.


Note. With this hummus recipe, I had hummus left over after consuming my toasts. Needless to say, I’m sure, save for tomorrow’s lunch, or share with a friend. I’d be inclined to go with the former, no judging…
With what was lying around in the fridge, here’s mine.
Hummus Toasts
nibs etc. original recipe. Serves 1-2.
Ingredients:
1 cup Cooked Chickpeas
3 tbsp Chickpea Water
1 clove Garlic
1 tbsp Tahini
1 tbsp Olive Oil
1/2 tsp Ground Cumin
1/4 Lemon Zest + Juice
1/4 tsp Salt
2 small Toasts of choice
1 Soft Boiled egg
1 Spring Onion
2 tsp Seeds [pumpkin, chia, linseed, sesame, poppy, sunflower] – divided
1/4 Red Onion
Method:
Firstly, that quarter onion that was lying around from the falafel? Slice it up, sit it in a jar covered with red wine vinegar, and set aside for later use – this can be stored in the fridge for several days.
Place all the ingredients into a blender and blitz for a few minutes – until smooth – scooping down the sides intermittently.
Taste, season accordingly with additional salt, lemon, cumin and or tahini.
To serve, half then slice – lengthwise – a sad little spring onion and dry fry it in a frying pan to bring it back to life, until it is softened and charring.
Smear as much hummus onto your toast as makes you happy – a couple tablespoons on each – topped with charred spring onion, your peeled and quartered egg, pickled red onion, sprinkling of seeds and a drizzle of olive oil.
Consume:
If you don’t have a sad wilting spring onion lying around in your fridge, substitute charring other greens such as kale or chard. Or use fresh herbs: mint, parsley, coriander.
Top with toasted nuts instead of seeds.
Less keen on ion, quick pickle a different vegetable, ex: carrot, cucumber etc.
6.

First, there was Hungry Root, making veggie based – obviously healthy - edible cookie dough. But that’s in New York.
So then there’s my coeliac friend. Who, turns out, is a very interesting source of inspiration as I’m always challenged to cook, or bake, senza glutine [that’s, without gluten, for those not as obsessed with Italian things to accidentally - on purpose - pronounce things as such].
Finally, there will be valentine’s day. Which calls for gooey, soft centered, and chocolate filled everything. – UPDATE. Even when it’s not Valentine’s Day – months pre, or post – life calls for gooey, soft centered, and chocolate filled everything.


So when it’s valentine’s day – or any other day of the week month year - with your coeliac friend, you’ve got just over a cup of cooked chickpeas remaining, and you’ve recently been browsing the Hungry Root instagram while stumbling across coeliac friendly recipes on the interwebs… the result is this.
AND MY GOD IT’S YUMMY.
It took a lot of self-control not to consume the entire tray…
Chickpea Cookie Tray
Recipe inspired by The Kitchn. Makes 15.
*please excuse the confused volume measurements. This is what happens when you move back from America but still grew up European, sort of… [If in need of conversions, maybe this'll help!]
Ingredients:
220g (1 1/4 cup) Cooked Chickpeas
160g Reserved Chickpea Water
1 Overripe Banana
1/2 cup Brown Sugar
1/4 cup/56g Unsalted Butter
1/2 cup Shredded Coconut
1/4 cup All Purpose Flour
1/2 tsp Baking Soda
1/2 tsp Baking Powder
Pinch Salt
1/4 cup Dark Chocolate Chips (70% and up, I used TCHO 84%)
1/4 cup Milk Chocolate Chips (I used TCHO 39%)
Method:
Heat oven to 190*C/180*C fan/375F, and butter a baking dish.
Blitz the chickpeas and their cooking liquid in a blender until a puree is formed. Into it, add the banana, and puree until smooth.
Cream the butter and sugar together – until sugar has dissolved and light in consistency. Add the chickpea and banana mixture to this, and whisk until fully incorporated.
To this, add the coconut, followed by all the dry ingredients. Mix until just incorporated. Finally fold in the roughly chopped chocolate so as to disperse well.
Tip into a buttered baking dish and bake 20-25 minutes, until a knife comes out with a couple of crumbs on it, the edges start to brown just slightly and the top appears to have baked completely.
Serve hot, or cold, or somewhere in between.
Consume:
At breakfast with yoghurt, for dessert with ice cream, or an afternoon snack as is [OOH or with a drizzle of nut butter..maybe…and a dollop of jam??].
Substitute butter with ¼ cup Olive Oil if attempting to make vegan – NOTE not yet tried, but should be fine [let me know if you give it a try!].
Add any nuts and dried fruit of your choosing: macadamia, walnut, cranberries etc.
